MENU

Party Walls

Tag: High-Performance Construction

SWA High Performance Design Best Practice: Limiting Shelf Angles in Masonry Buildings

BACKGROUND

The multifamily building industry has adopted a best practice long touted by the building science community: continuous insulation at the exterior of the building. However, even in this ideal circumstance in which the insulation is installed flush and without gaps against the exterior substrate (concrete block or sheathing) with an air barrier applied to this substrate beforehand, the overall performance of the insulation will be vastly reduced by the installation of shelf angles.

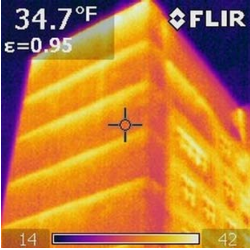
Shelf angles (also know as relieving angles) are designed to support the expansion and contraction of the brick coursing; however, this presents a direct challenge to the continuity of exterior insulation. Standard design details interrupt the exterior insulation at every shelf angle, typically at every floor in line with window lintels. Since the shelf angle is made of steel, a highly conductive material, this interruption impacts not only the effectiveness of the insulation in general, it provides a considerable thermal bridge over the entire horizontal band of the building at every occurrence.

A recent article by Urban Green Council, “State Energy Code Clarification Will Stem Heat Loss through Walls,” made it clear that a continuous shelf angle has “about the same poor thermal performance as [an] exposed slab edge.” The full article can be read here.

Fig. 1. An infrared (IR) image that shows the thermal impact of shelf angles

Fig. 1. An infrared (IR) image that shows the thermal impact of shelf angles


SWA RECOMMENDATION #1: LIMITING SHELF ANGLES

Not all buildings require relieving angles. Building owners, architects, and structural engineers should first ask themselves whether relieving angles are necessary at all for the building being designed. If it is determined that these angles will be necessary, the next question the structural engineer should ask himself is what the minimum frequency necessary is to support the brick course. Generally speaking, buildings do not need one shelf angle per floor—despite this being common practice.

In addition to the aforementioned energy implications involved in specifying shelf angles, there are other benefits to eliminating these steel members when possible. The most obvious impact is on upfront costs. At approximately $25/foot of angle iron (via Union Iron Works), shelf angles for multifamily buildings in New York City can cost tens of thousands of dollars.

Upfront and operating (i.e. energy) costs aside, there is also the embodied energy of the material to consider. Not only does the manufacture of the steel angle contribute to its embodied energy, but also all of the energy used to transport these pieces to the project site. By reducing the need for the production of these angles, the overall energy expended to construct a new building decreases.

One additional consideration for owners is the maintenance required for shelf angles. The introduction of brick lintels creates an inherent and inevitable need for future maintenance. Since the cost of this upkeep is often considerable, owners may wish to use the opportunity to limit shelf angles during design to reduce long-term maintenance costs.


SWA RECOMMENDATION #2: OFFSETTING SHELF ANGLES

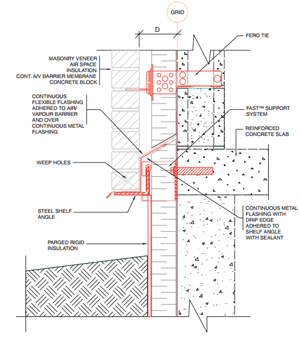
In addition to limiting their frequency, consider a shelf angle offset to further reduce thermal bridging. One such system that allows for this is manufactured by FERO called FAST (FERO Angle Support Technology).

Fig. 2. Typical FAST TM system detail

Fig. 2. Typical FAST TM system detail

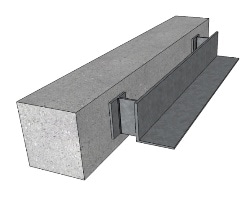
FAST is designed to offset the shelf angle from the structural backing, allowing the insulation and air barrier installations to be more continuous. More information about this product can be found on their website.

SWA welcomes the input of design teams for other possible solutions to achieve a more continuously insulated wall. By accomplishing this, the building will have a truly continuous thermal envelope. As a result, thermal bridging will be eliminated along with the associated energy losses.

Fig.3. An offset shelf angle

Fig.3. An offset shelf angle


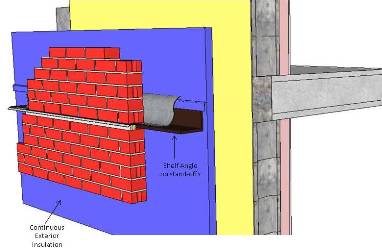
Fig.4. A wall section with an offset structural shelf angle

Fig.4. A wall section with an offset structural shelf angle


CONCLUSION

To implement best building practices, fulfill the continuous insulation requirements of certification programs, and comply with NYC Energy Conservation and Construction Code, SWA recommends limiting the number of shelf angles in the construction of the envelope. This will help limit upfront material and long-term maintenance costs.

SWA also recommends off-setting the shelf angle to reduce the thermal bridging these steel elements create. Fewer shelf angles means that there are less obstacles imposed on exterior insulation, resulting in less thermal bridging. Limiting the impact of shelf angles produces a more robust and insulated envelope that will, in turn, positively impact the energy performance of the building and comfort of its occupants.

SWA would like to thank Robert Murray for his assistance with this article.

Robert J. Murray, P.E., LEED AP, Principal
Murray Engineering, PC
307 Seventh Avenue, Suite 1001
New York, NY 10001
Telephone: 212.741.1102
Email: rmurray@murray-engineering.com


REFERENCES

1. Anderson, J., D’Aloisio, J. DeLong, D., Miller-Johnson, R., Oberdorf, K., Ranieri, R., Stine, T., and Weisenberger, G. “Thermal Bridging Solutions: Minimizing Structural Steel’s Impact on Building Envelope Energy Transfer.” American Institute of Steel Construction. Modern Steel Construction, 1 Mar. 2012. Web. <http://msc.aisc.org/globalassets/modern-steel/archives/2012/03/2012v03_thermal_bridging.pdf>.

2. FERO: Engineered Construction Technologies. Product Catalogue. Edmonton: FERO: Engineered Construction Technologies, 2014. Web. <http://www.ferocorp.com/pages/fast/fast.html>

Lindenguild Hall: A Contemporary Approach to PV in Green Affordable Housing

Written by Katie Schwamb

PartyWalls_KatieSLinden

Katie Schwamb, one of the project’s contributing sustainability consultants

The Lantern Organization’s Lindenguild Hall is a 104-unit multifamily residential project that provides permanent shelter for under-served populations in the Bronx. On-site supportive service programming, open-use learning and activity rooms, and outdoor leisure space provide an enriched living experience for tenants. Contributing to the programmatic requirements of both LEED® for Homes™ and NYSERDA’s Multifamily Performance Program (MPP), the building’s sustainable and energy-efficient design features include high-efficiency boilers, a high-performance envelope assembly, low-emission finishes, low-flow plumbing fixtures, and a water-efficient landscaping and irrigation system. While all of these design elements contribute synergistically to high-performance operation, there is one feature that distinguishes Lindenguild Hall from many other affordable and supportive housing projects in New York…its extensive photovoltaic (PV) array.

Lindenguild Hall - Green Affordable Housing

Lindenguild Hall – Green Affordable Housing

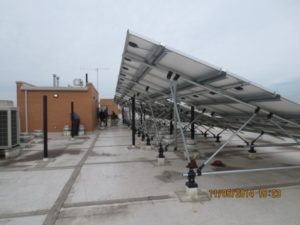
Located on the building’s high-albedo roof, this 66-module solar electric array captures energy to help power lighting, heating, and cooling systems within the building’s common spaces, while reducing overall demand on the city’s electrical grid. An advanced feature of Lindenguild Hall’s PV system is its capacity for online monitoring, which provides building managers with real-time results, including metrics for solar generation in kW (kilowatts) and the overall kWh (kilowatt-hours) generated to date. Availability of this data enables management to assess the positive impact of renewable energy systems on their building’s performance. Long-term implications of alternative energy production on building stock include reduced life-cycle cost and protection against municipal energy uncertainties. Though less quantifiable , installation of innovative green technology adds momentum to standardizing sustainability in affordable housing design.

Lindenguild Hall - Solar Array for Green Affordable Housing

Lindenguild Hall – Solar Array

Lantern Organization, a not-for-profit housing developer and service provider, operates by actively addressing housing needs and offering social initiatives to strengthen disadvantaged NYC communities. SWA’s Residential Green and Multifamily New Construction groups helped Lindenguild Hall navigate the LEED for Homes program and secure NYSERDA MPP incentive funds. Committed to delivering the greatest benefit to their residents, Lantern acknowledges the added value of incorporating green building features into their affordable projects. Increased energy efficiency and improved indoor air quality potentially translate to lower energy cost burden and decreased susceptibility to disease for low-income populations.

The $300 Investment Every New Construction Home Should Make

Whether code built or energy efficient, if your new home has a poured concrete foundation and floor slab, please pay particular attention to the following. While older, leaky homes result in low interior moisture levels (thus the desire for humidifiers on central furnaces); newer, tighter homes will typically have relative humidity levels in the 25-50% range naturally.

Window

Moisture from construction materials in new homes must be managed to avoid problems like interior condensation and mold.

In some cases, there is a need to actually dehumidify to maintain relative humidity below 50% during the winter. In the first 1-2 years after the home is built, concrete foundations expel massive amounts of moisture as part of the concrete curing process called “hydration”. As the concrete cures, some of the water in the concrete mix reacts chemically with the portland cement and forms the hardened concrete, and some of the water evaporates to the surrounding air. The exterior water resistant/proof coating on the below grade portion of the foundation prevents moisture from escaping that way. Typically only a 1-2 foot tall area along the perimeter of the above-grade portion of the foundation is available for drying to the exterior.  It is more likely that the moisture will be expelled to the interior of the home and therefore, must be managed to prevent deleterious moisture-related problems such as condensation, mold, wood rot, etc.  Framing lumber also contributes: lumber that starts out kiln-dried at 18% moisture levels, will eventually end up at 6%.

How to deal with that moisture? Here is that cheap investment alluded to: an ENERGY STAR dehumidifier with a built-in humidistat.  This unit should be plumbed to a drain to allow continual operation (without having the occupants empty a bucket).  In addition, the dehumidifier should be installed in the basement or crawlspace as soon as the structure has been enclosed and power is available. In terms of the construction process, it is recommended that the foundation be the last item to be insulated to allow for the internal construction moisture to be removed prior to enclosing. After a year or two of occupancy, construction material moisture levels will become stabilized at “normal” levels. In the interim, remember to “build-tight and ventilate right”, but also manage that construction moisture.

Local Law 87 – What’s Happening and What’s Ahead


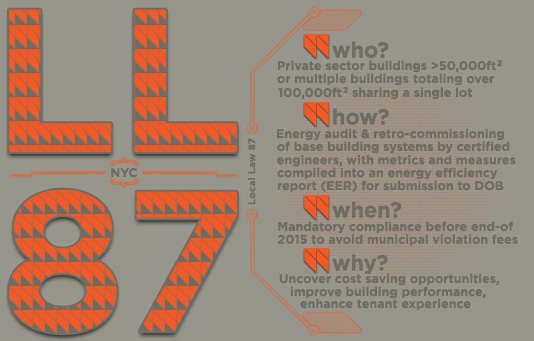
LL87-Local_Law_87_Local-Law-87-Header

Calendar year 2015 marks the start of the third year of mandatory Local Law 87 compliance in NYC. The Law—which requires buildings over 50,000 sq ft to conduct an energy audit and retro-commissioning study once a decade—has, to date, been characterized by market uncertainty and a somewhat hesitant response from the real estate community. These conditions stem largely from an unclear expectation as to what the future will hold, and what, if any, blow back there might be for being the owner of a poor-performing building.

This lack of clarity has created a wide diversity in the approach that owners opt to take in complying with Local Law 87. A notable pool of building owners, for example, have viewed the law as a burden enacted by NYC, and have opted to take the cheapest available, low-bidder approach to compliance. A large number of newly formed energy consulting firms have popped up to provide “cheapest-in-class” services, this despite the fact that many of these startup firms lack the qualifications and experience necessary to actually perform a compliant Local Law 87 project. As is almost always the case, you get what you pay for. On the other hand, a different set of building owners have viewed the law as an opportunity to improve the performance of their buildings by engaging the service of discerning engineering service providers. These owners see the value in having a 3rd party vet the operation of their buildings, as they realize that operational cost savings drop straight to the bottom line, driving improved NOI, increased asset value, while guarding against the risk of future volatility in the commodity markets.

The real estate community has, by and large, accepted Local Law 87 as a fact of life, but the lack of a clearly demonstrated vision of future goals has created a deeply fragmented understanding of how the Local Law 87 process can and will impact a building’s operation. Signs, though, are pointing toward a clarification of what this process will require into the future, and there is reason to believe that the lay of the land will be quite different in years to come. For starters, the DeBlasio administration, in the fall of 2014, issued their One City Built to Last plan. This ambitious plan provides a policy framework for achieving 80% emissions reductions in NYC by 2050—no small task, to be sure. The aggressive nature of the plan requires that the city dig deep into the performance of the built environment in order to achieve these reduction targets, as buildings account for about 70% of NYC emissions. The DeBlasio administration has taken a “carrots and sticks” approach toward compelling change and ensuring adherence to their agenda: state and local incentives have been dangled in front of the real estate community to encourage proactive adoption of energy conservation practices by building owners, while the not-so-thinly-veiled threat of future mandates loom on the horizon for those actors that fail to take appropriate action. As DeBlasio was quoted in a September Real Estate Weekly article, “For private buildings, we’ll set ambitious targets for voluntary reductions, but if steady progress is not made, we will issue clear mandates,ˮ said deBlasio, adding, “Our long-term goal is bolder still — charting a path to a full transition from fossil fuels.” Again…not so thinly veiled.

Notable carrots include limited time incentive programs, such as the Demand Management Program offered jointly by NYSERDA and ConEd, and the forthcoming establishment of a retrofit accelerator program, which will scrub Local Law 84 (benchmarking) and 87 data to facilitate engagement between key stakeholders as the City attempts to play matchmaker in a Love Connection style game of emission reduction through market transformation. Many in the real estate and sustainability arenas see great promise and opportunity in these models.

Love it or hate it, the real estate community and others need to acknowledge that the landscape is changing, and the vision of the future—at least as how Mayor DeBlasio sees it—is taking shape.
Early adopters of emissions reduction practices—e.g., buildings that participate in voluntary programs such as the Mayor’s Carbon Challenge and those that take a more rigorous approach to the Local Law 87 process—stand a better chance of avoiding the “heavy hand of government” that DeBlasio so publicly campaigned on. And they might even get to munch on a few carrots along the way.

LL87-Local-Law-87-LocalLaw87-Infographic

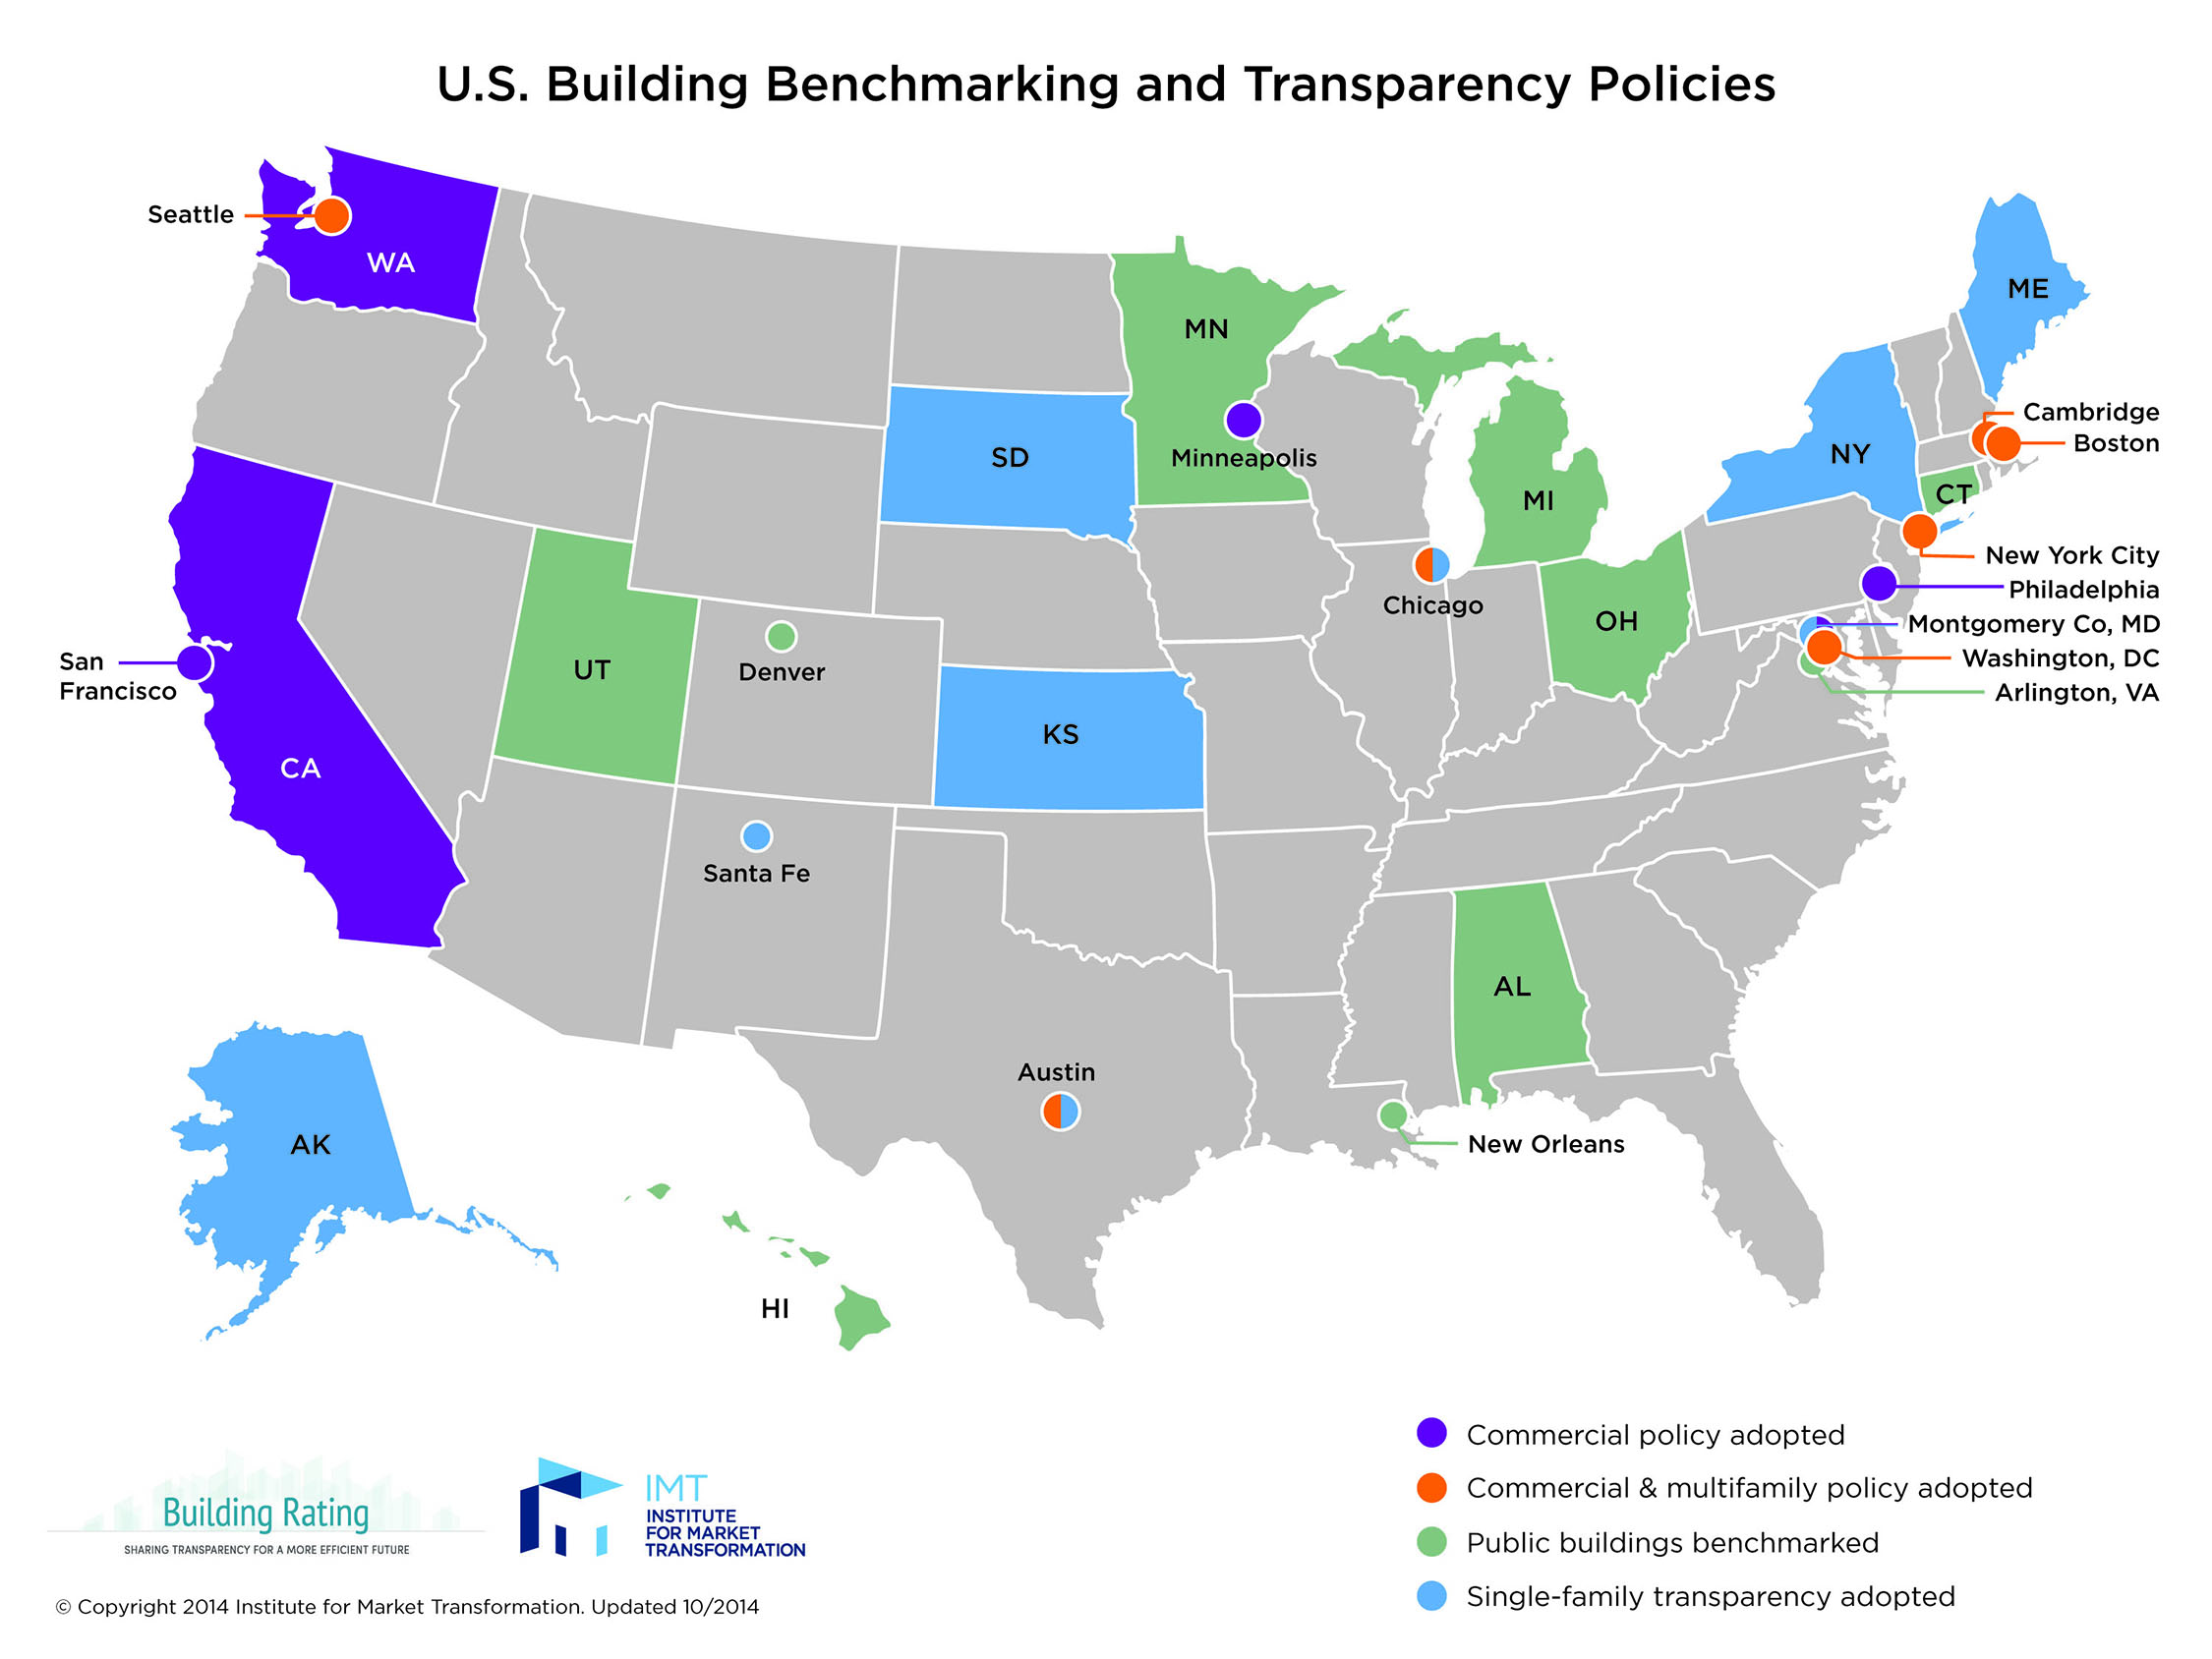
Mandatory Energy Benchmarking.. Coming to a City Near You?

Measurement enables Management; Transparency enables Accountability… The quintessential concepts driving adaptation of mandatory energy benchmarking legislation.

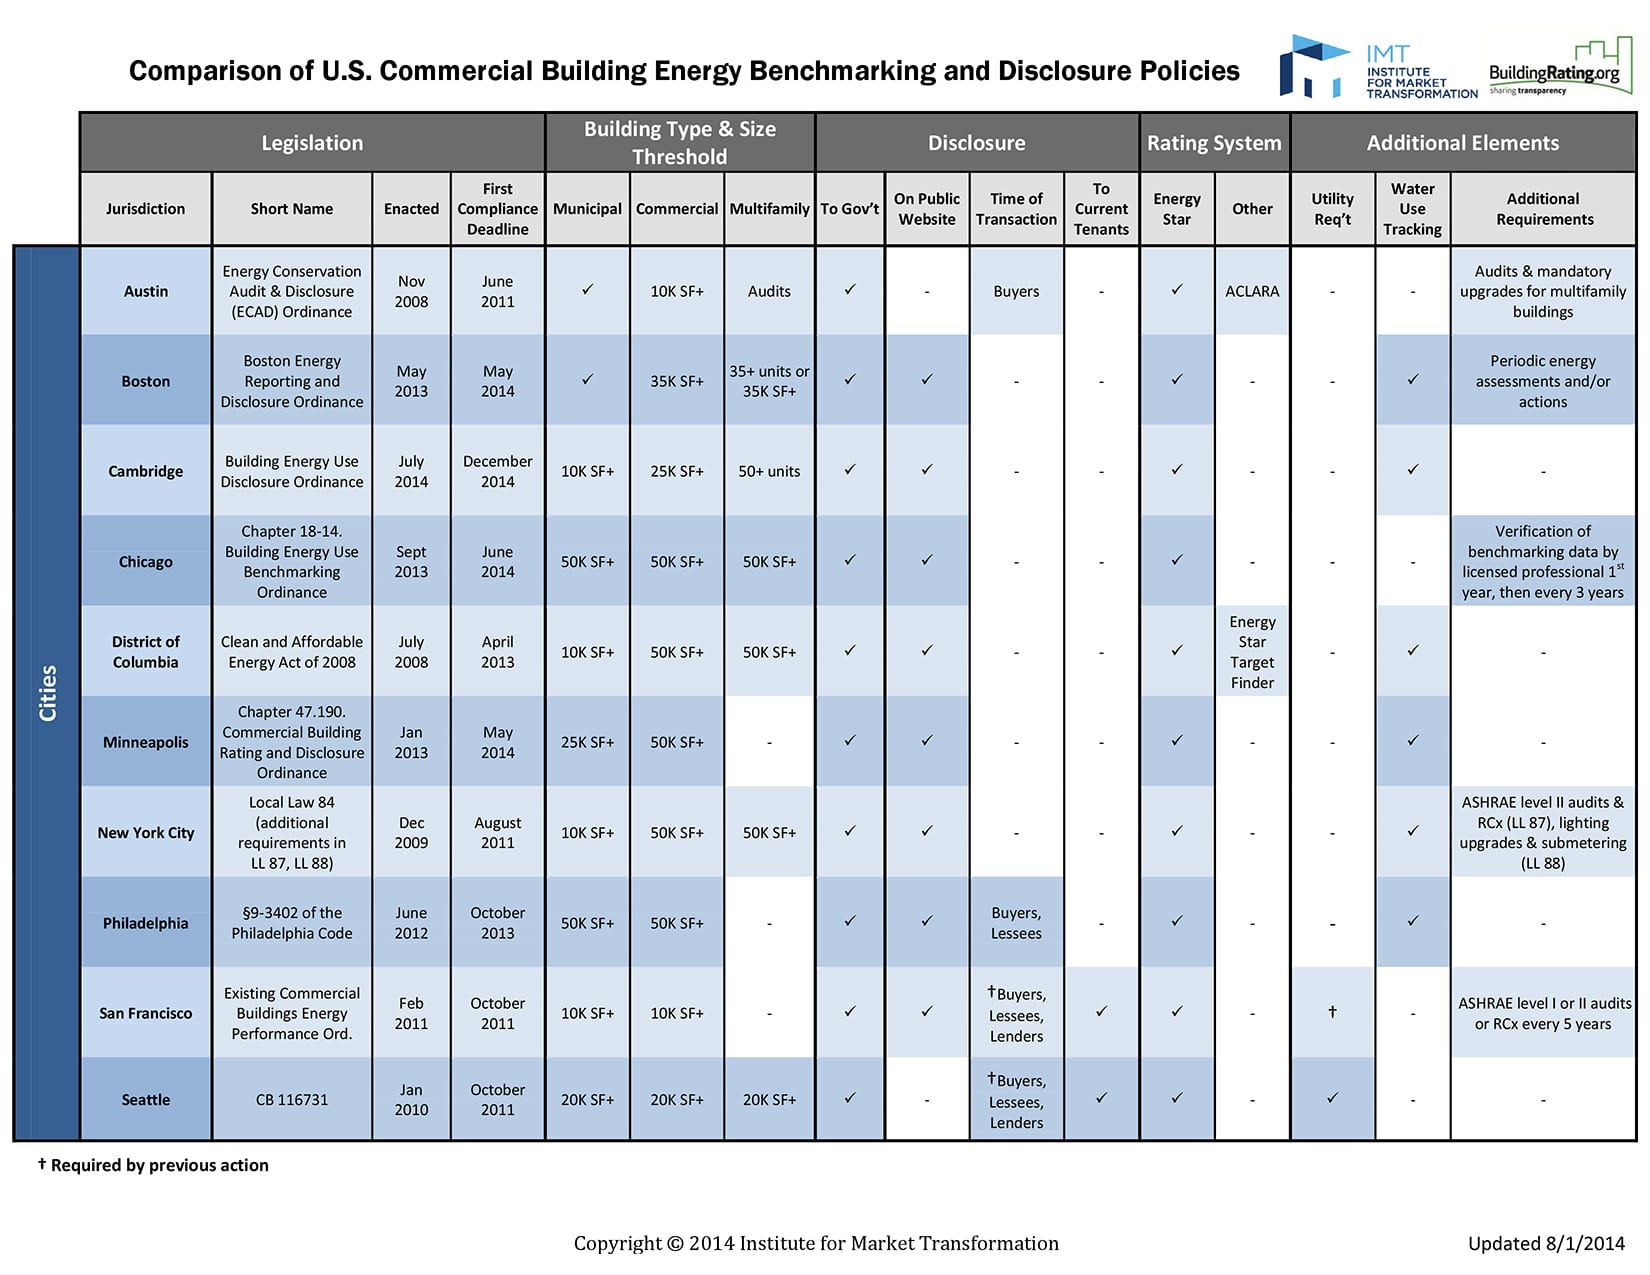
Commercial_Benchmarking_Policy_Matrix (cities) - 8.1.14 (2)

Mandatory energy benchmarking represents a pivotal step towards reforming energy usage in American cities, as it galvanizes populations through collective reduction. Like any immature “innovation”, the practice faces barriers and static hindering widespread adaptation and dissemination into the mainstream.

What factors influence proliferation?

Unique building stock and varied regulatory needs necessitate city-specific reporting plans. Until there is a scaleable model of best-practices, development will continue to be resource and time intensive for administration.

Complexity in execution threatens data integrity and program usefulness. Unintentional errors, difficulty in obtaining information, and unfamiliarity with ENERGY STAR’s Portfolio Manager all weaken database strength. The remedy lies in educating elected reporters. Program handlers must be well versed with the operations and techniques necessary to perform their role effectively.

Stakeholder push-back during implementation deters participation and damages program reputation. Greater visibility of post-retrofit results will dispel doubts of program usefulness, while increased availability of financial incentives will quiet claims of marginalization [under-performers stigmatized as poor living options] and unfair penalization [fining of historic buildings or financially underserved properties].

Energy Codes: Who Needs ‘Em?

  • [av_image src=’https://www.swinter.com/party-walls/wp-content/uploads/sites/2/2014/11/EnergyCode-copy-234×300.png’ attachment=’177′ attachment_size=’medium’ align=’left’ animation=’no-animation’ link=” target=” styling=” caption=” font_size=” appearance=”][/av_image]

Energy Code. We could use that term for many things: how you feel after a cup of coffee, before a dreaded workout, or even at 2am when you’re staring at your bedroom ceiling knowing you have to be up in 4 hours. But here we’re talking about buildings, specifically in NYC.

Apparently, nine out of every 10 buildings have failed to meet the energy code, a set of standards that have been in place for a whopping 30 years. Crain’s New York published an article about it, featuring the NYC DOB’s audit results of thousands of architectural plans for new and renovated office and residential buildings.

Worried that your building might fail? Don’t fret, SWA’s in-house energy code expert, Michael O’Donnell, answered a few questions for us. Get the low down on what the energy code is all about and what these results mean.

Party Walls: So tell us, what is the energy code? And what (or who) brought about the need to enforce an energy code?
Michael O’Donnell: The energy code contains the minimum requirements that buildings must meet with regards to energy efficiency measures. According to the Department of Buildings, to meet the City’s goal of reducing greenhouse emissions by 30% by 2030, the New York City Energy Conservation Code (NYCECC) sets energy-efficiency standards for new construction, alterations, and changes to existing buildings. All new building and alteration applications filed on or after December 28, 2010 must comply with the 2011 edition of the NYCECC. The need to for an energy code has been around for many years but it is only really being enforced relatively recently.

PW: What are the benefits of a building meeting the energy code?
MO: Buildings that effectively meet the energy code will be better insulated, have better HVAC systems, and better lighting systems. As these systems are designed, implemented, and optimized, reduced operating costs for both owners and tenants will result. There are also environmental benefits of reducing greenhouse gas emissions achieved by utilizing less electricity and/or heating fuel.

PW: What are the potential risks of not meeting the energy code standards?
MO: Potential risks of not meeting the energy code include tenant comfort complaints, higher operating costs for electricity and/or heating fuel, and, more recently, action by the Department of Buildings. Energy code audits of building plans have the potential to stop a project in its tracks as well as impose fines for constructed buildings that are not meeting the code.

PW: What are the biggest reasons buildings fail to meet the energy code?
MO: There are a few reasons buildings fail to meet the energy code. Specific details are often missed or not included in the construction drawings and specifications. If details are not included, the contractor will not incorporate these items into what actually gets built. Even if specific energy related items are incorporated, the contractor may not have the knowledge to properly install or execute what is shown. Finally, it takes a trained inspector to know what to look for to ensure buildings are compliant with energy code. NYC requires the large majority of projects to file a “TR8: Technical Report Statement of Responsibility for Energy Code Progress Inspections” form through which a licensed architect or engineer takes the responsibility of inspecting for energy code compliance. This form is required in NYC, but other jurisdictions, which do not require the progress inspection run the risk of having items overlooked or missed since there is not a third party inspecting specifically for energy code items.

Read the Crain’s New York article here:
http://www.crainsnewyork.com/article/20140818/REAL_ESTATE/308179994/9-of-10-building-plans-fail-basic-test

Can A House Be Too Tight?


The Importance of Mechanical Ventilation

During most presentations we give about air sealing and infiltration, like clockwork someone will ask, “but doesn’t the house need to breathe, aren’t we making buildings too tight?” This is a popular green building myth, but  people need to breathe, walls don’t. In fact buildings perform best when they’re air tight and we can temper, filter and regulate the amount of fresh air.

We know the symptoms of poor ventilation – odors, humidity issues, condensation on windows, high levels of chemical off-gassing and even elevated carbon monoxide levels. Some of these effects are immediately apparent to occupants (odors, window condensation) while others may be imperceptible (carbon monoxide). Indoor air quality is a comfort, health and safety concern. However, these problems aren’t necessarily symptoms of tight buildings and can occur in all types of construction, old and new, tight and leaky.

Natural Ventilation Doesn’t Work Anymore

In the past buildings were ventilated with outside air naturally when the wind blew and/or it was cold. If this natural ventilation (or what building professionals call air infiltration) ever worked it doesn’t anymore.

red barn image

“Did you grow up in a barn?” Most of us learned as children the importance of keeping outside air out during heating and cooling seasons. However natural ventilation through building cracks brings unintended moisture and temperature differences that can cause condensation.


Old buildings had no insulation or air sealing, so structural failures caused by condensation within a wall assembly rarely occurred. Building codes now require insulation and air sealing which helps lower our energy bills and keep us comfortable inside. But when infiltration happens in a wall full of insulation, condensation can occur on the cool side of the wall assembly, which over time can rot the framing and cause structural issues. This is why it’s critical to prevent air leaks and better understand the thermal boundary.

Americans spend more time in our homes than ever, almost 15 hours per day by some estimates, and humans give off a lot of moisture. While home we tend to keep the windows closed. We’re also seeing increasing amounts of Volatile Organic Compounds (VOCs) emitted from our paints, furniture and household products that are made with chemical compounds that we know little about. For example, solid-wood furniture does not offgass, but plywood, particle board and foam sure do. How much solid wood furniture do you have in your house? Taken together this means there is more moisture, odors and pollutants added to our homes each day than was the case 30 years ago. The EPA estimates indoor pollutants to be 2 to 5 times higher inside homes than outside.Because of all these indoor pollutants, we clearly need to bring fresh outdoor air into the house.

However, the unintentional natural ventilation air our buildings do get rarely comes directly from outside. In the best-case scenario it creeps in through the various cracks in the exterior walls and windows, but most often comes from the least desirable locations shown in the image below: crawlspaces, garages and attics. Leakage from those locations is certainly not “fresh” air. Do you want to breathe in hot dusty attic air, or damp air from your crawlspace? You just might be.

Image of infiltration

Natural ventilation is forced through infiltration points which are most often from the unhealthiest locations in homes

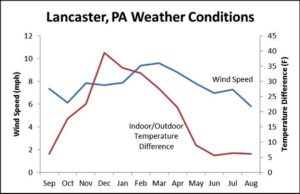
Moreover, unintentional natural ventilation (infiltration) is unreliable and poorly distributed. Infiltration is primarily driven by wind speed and the temperature difference between outdoors and indoors. These weather variables vary day-by-day and season-to-season. For instance, the chart below shows the average conditions for Lancaster, PA. Note the weather fluctuations throughout the year:

  • During summer wind speeds are almost 50% lower
  • The temperature difference is 6-8 times greater during winter

lancaster-weather-conditions chart

These erratic conditions cause the building to be over-ventilated half the time and under-ventilated the other half. Also, infiltration is poorly distributed throughout the house. A room with a couple exterior walls and leaky windows will get far more outside air than an interior kitchen or bathroom. Wind and temperature differences drive ‘natural ventilation’ in the form of infiltration in homes. However these factors are highly variable and unreliable.

To summarize the need for mechanical ventilation:

  • There are more pollutants in our homes than ever, requiring more ventilation air
  • Homes are better insulated and air sealed than they used to be
  • Much of the infiltration that does occur comes from undesirable locations
  • Even the portion of infiltration that can be considered “fresh air” varies sporadically based on weather conditions
  • Having air leaks in an insulated wall, attic or floor assembly can cause condensation and create structural failures.

For all these reasons, relying on air leaks as natural ventilation no longer works. It doesn’t work for normal homes, and it especially doesn’t work for insulated or tight homes.

Build It Tight, Ventilate It Right

The better approach is to provide controlled mechanical ventilation by providing enough air to meet ASHRAE 62.2 and air seal the house to prevent moisture issues, high energy bills, and air from the attic and crawlspace or basement from polluting our indoor air.  As the mantra goes, “build it tight, ventilate it right!”

A well-designed ventilation system brings several advantages.

  • It allows control over exactly how much fresh air is delivered and when.
  • You can adjust the amount of ventilation air if the occupancy changes (e.g. kids go off to college) or shut it down altogether while on vacation, or when windows are open.
  • It delivers a consistent amount of air year-round, no matter what the weather conditions.
  • It draws air directly from outside, so the air is guaranteed to be fresh.

The main disadvantage to mechanical ventilation is the cost to run the fan. There are many different types of systems, with widely varying costs. As the following case studies shows, this additional cost can be more than offset by the savings in reducing the uncontrolled infiltration.

Mechanical Ventilation Case Study

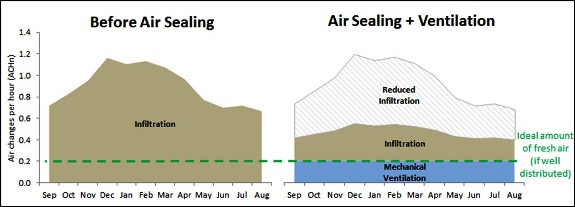
Consider the following single family detached home renovation project in Lancaster, Pennsylvania. Before renovation, the house had no mechanical ventilation, and much of the infiltration air came from the attic and basement, providing dirty air to the house. The house was leaky enough to meet ASHRAE 62.2 levels for natural ventilation. But with an infiltration rate of 1.1 air changes per hour, the house was replacing all its indoor air every hour, leading to huge heating bills.

During the renovation air sealing brought the infiltration down by 70% and mechanical ventilation was added to deliver the recommended ventilation rate, which in this case was 0.20 ACHn.

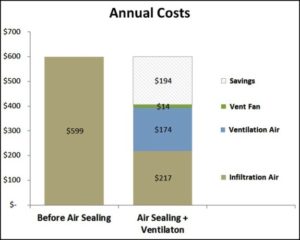
Looking at the annual utility bills, in the original house it cost almost $600 per year to heat the infiltration air. After air sealing this was cut to $217. Heating the ventilation air cost $174, and running the fan cost an additional $14 per year. Not only is the house now less drafty and more comfortable, the indoor air quality is substantially better AND the homeowner is saving $194 per year.

Not every case follows this same savings ratio. If the original house was  tighter to begin with there may not have been any theoretical savings. If the mechanical ventilation system were more efficient, there could be more savings.

But remember that mechanical ventilation puts the control in the hands of the occupant, not mother nature. If there seems to be too much ventilation, the occupant can dial it back. If there are indoor air concerns the occupant can increase the rate.

Designing an Effective Mechanical Ventilation System

There are several strategies for designing a good mechanical ventilation system, and there isn’t a one-size fits all approach for homes, multifamily buildings and commercial spaces. It’s important to keep occupants in mind and install the proper controls to make the system work for them. Everyday Green has helped MEPs and HVAC contractors select and size mechanical ventilation systems for all budgets and size buildings, homes and unit spaces. But one thing is clear: relying on air leaks to provide fresh air is no longer an effective strategy. Contact us today with your mechanical ventilation questions.

Andrea Foss


By Andrea Foss, Director,  Mid-Atlantic Sustainability Services

Getting it Right – HVAC System Sizing in Multifamily Buildings

Properly Sizing Mechanical Systems in Multifamily Buildings

Multifamily buildings can be a unique challenge when it comes to selecting effective heating and cooling systems. In the Washington, DC region’s mixed-humid climate, humidity control becomes a central challenge because of a couple inescapable realities.

  1. There is a lot of moisture added per square foot from cooking, bathing and even just breathing due to the dense occupancy.
  2. The small exterior envelope areas mean the air conditioner won’t kick on very often, and thus won’t have a chance to remove moisture.

High humidity can lead to complaints over comfort, condensation on registers and exposed duct work, and even mold. To effectively remove moisture, the air conditioner should run for long stretches. This means properly sizing mechanical system. Unfortunately many project teams exacerbate the problem by selecting grossly oversized cooling equipment that runs even less frequently.

Steps to Right-Sizing Mechanical Equipment

  1. Perform accurate calculations using the Manual J process to estimate peak heating and cooling loads
  2. Consult the manufacturer’s performance data at design conditions, and
  3. Select the smallest piece of equipment that will meet the load.

Common Problems When Sizing Mechanical Systems

 “Can’t I just use the worst-case orientation?”

Large windows in a corner unit can change the equipment sizing needs compared to interior units

Large windows in a corner unit can change the equipment sizing needs compared to interior units

No. In most cases the largest envelope load in apartment units is the windows. A unit with floor-to-ceiling windows facing west will have very different loads than the same unit facing north, so be sure that the load calculation reflects the actual orientation. If the same unit type occurs in more than one orientation calculate the loads for each orientation and make selections accordingly. This may require different selections and duct layouts for different orientations.

“Can I use commercial software?”

Yes, but you have to be careful. Commercial load software like Train TRACE and Carrier’s HAP are primarily geared towards non-residential space types that have very different use profiles. For instance, in an office setting you would expect lighting and equipment to be 100% on during the peak afternoon cooling hours. However, in a residential setting few if any lights are on during the day.

The commercial programs also like to include more outdoor air than you actually see in apartments. A reasonably well-sealed apartment will have very little natural outdoor air infiltration (remember only 1 or 2 sides of the apartment “box” are actually exposed to outside) and mechanical ventilation should only be about 20-35 CFM depending on the size of the unit. It is not uncommon for loads to drop by half once those inputs are corrected.

 “Will small systems have enough power to get the air to all the rooms?”

Smaller systems don't mean less power

Smaller systems don’t mean less power

Absolutely. First of all, the smallest split systems available are 1.5 tons, which is really not that small. Second of all, 1.5 tons air handlers are rated to 0.5 IWC external static pressure just like 2 and 2.5-ton systems. If that sounds like gibberish it means 1.5 ton systems have the exact same “power” to push air through long runs as larger systems.

The blower motor is smaller only because it’s pushing less air, just like a motorcycle has a smaller engine than a car but can still accelerate as quickly. We have seen 1.5 ton systems used in 1500+square feet  2-story homes. If you can’t get air to a 900 square foot apartment you have a duct sizing issue, which would be a problem no matter what size the air handler.

 “Doesn’t each room need 100 CFM of airflow for comfort?”

Well, maybe. Is 100 CFM what the load calculations show is needed? There is no such thing as a minimum airflow threshold for each room. The amount of air required is in direct proportion to that room’s heating and cooling load. If the calculations show a small load and only 40 CFM required you should supply 40 CFM. In fact, oversupplying 100 CFM will actually cause discomfort since that room will always be a few degrees off from the rest of the apartment. Sitting under an oversupplied register could be loud and drafty as well.

“But can’t I just size by bedroom count?”

No, rules of thumb don’t cut it anymore. For buildings built to 2009 or 2012 code in our climate zone (CZ4), most apartment units will have loads less than 1.5 tons, no matter how many bedrooms. There may be a few 2-ton or (rarely) 2.5-ton systems for larger apartments on the corner or top floor, but those are the exception.

If your mechanical plans show 1.5 tons for all 1 bedrooms and 2 tons for all 2 bedrooms it probably means

  1. Accurate sizing procedures were not followed, and
  2. A lot of those 2 bedrooms actually only need 1.5 ton systems

The only way to know for sure is to perform the calculations.

Conclusion

Most of these issues are the result of a very natural instinct to be conservative in the face of uncertainty. The truth is there are a lot of variables that will change the real-world heating and cooling load in a unit: how many people are in the apartment, when they are cooking, are they using blinds. The problem is in this case “conservative” means designing for temperature control at the expense of humidity control. Every extra ½ ton capacity means less dehumidification – that’s a fact. The only way to control both temperature and humidity is to perform accurate calculations, resist the urge to add extra safety factors, and size the equipment strictly according to the calculated loads.

As an added benefit, smaller equipment requires smaller electric service capacities. Especially in a rehab situation with existing service, choosing right-sized equipment is more likely to allow the use of existing service instead of requiring expensive service upgrades.

All About Infiltration Part 2: Blower Door Testing

Blower Door Testing to Measure Air Leaks

Every home has air leaks, but the cumulative amount of leaks can vary widely based on the air sealing efforts. Infiltration and air sealing basics are covered in part 1 of this post.

To measure the amount of leakage in a home we use a tool called a blower door, which is comprised of a calibrated fan, a mounting system to attach the fan to an exterior door, and a manometer which measures pressure.

To understand the principle behind the blower door test imagine a large parade balloon like Kermit here. If the balloon is completely air tight we can pressurize it, shut off the valve, and the balloon will remain inflated indefinitely.

Now imagine the balloon has some small leaks at the seams. To keep it inflated we need to continuously blow in air to replace the air leaking through the seams. The larger the leaks are, the more air is required. Thus, if we can measure the amount of air we are blowing into the balloon to keep it fully inflated, we can infer how leaky the balloon is.

That’s exactly what a blower door test does: it measures the amount of air needed to keep a house at an elevated pressure of 50 Pascal (i.e. “inflated”), and we use that measurement to infer how many leaks are present.

Blower Door Test Metrics

The blower door results can be expressed in a few different metrics. The most common one is air changes per hour (ACH), or how many times a house’s air completely replaced in a given hour. Since we take our blower door measurement at 50 Pascal most codes and standards reference the air changes at that elevated pressure (ACH50), but we can also calculate the air changes under natural conditions (ACHn).

For example, a code-built new home with decent air sealing might have 7 air changes per hour at 50 Pascal (ACH50), meaning if we kept the blower door running for an hour it would pump in enough air to completely replace the home’s air 7 times. This would translate to about 0.35 natural air changes per hour (ACHn), or about one complete air replacement every 3 hours.

What’s A Good Blower Door Test Number?

The metrics and math can get a little technical so let’s put them in context. Here’s a rough scale to compare your blower door test number to other standards:

10-20 ACH50 – Older homes, like living in a “barn”

7-10 ACH50 – Average new home with some air sealing but no verification and little attention to detail

7 ACH50 – OK infiltration level and the 2009 IECC energy code requirement

3-5 ACH50 – Good and achievable target for most new homes. The ENERGY STAR reference home is 5 ACH50 for climate zone 4 which covers DC, MD, VA and part of PA. The majority of PA is 4 ACH50 for the ENERGY STAR reference home.

3 ACH50 and lower – Tight home with great air sealing, and required by the 2012 energy code adopted in MD and coming to other jurisdictions soon.

.6 ACH50 – Super tight home and the Passive House standard.

Using a Blower Door Test to Reveal Defects

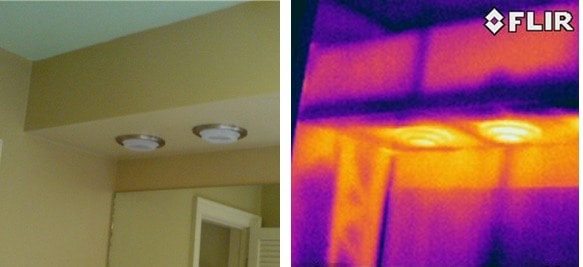
In addition to quantifying air sealing effectiveness, a blower door test can also help find defects, especially in conjunction with an infrared camera. The blower door will exacerbate the natural infiltration occurring in a house making air leaks easier to find because the air outside forcing its way in shows up as a different color on the IR camera. For example the image below shows a bathroom soffit built below an attic without a proper air barrier.

The photos below were taken in the summer during an existing home energy audit. The infrared photo on the right shows warmer colors in yellow and is the hot summer air coming in through the can lights and walls next to the soffit.

The problem is the air barrier doesn’t align leaving pathway for air to infiltrate. Everyday Green reviews plans for inclusion of proper air barriers and then we inspect them onsite before drywall is installed to prevent bypasses like the ones in the IR image above.

Stop Those Air Leaks – All About Infiltration

What is Infiltration?

Infiltration is the uncontrolled or accidental introduction of air, often called air leakage.

A lot of people assume air leaks happen predominately around windows and doors. In actuality air is driven through our homes and buildings by the stack effect – warm air rising. This means the attic or the roof, and the basement, are most critical for preventing air leaks and infiltration. Infiltration is a bad thing: not only is it a huge energy waste, it brings in air from the dirtiest places like attics and crawlspaces, and spreads that contaminated air through the living space.

The key to stopping infiltration is creating a good air barrier.

Think of a building’s insulation like a wool sweater. On a calm fall day the sweater is enough to keep you warm. If a breeze picks up, though, the cold wind will blow right through the wool and you will probably reach for your windbreaker. In a home we call the windbreaker layer the air barrier, and it is just as important as the insulation. Insulation limits heat transfer through the walls and roof, but only when paired with an effective air barrier.

Stop Infiltration – Air Barrier Rules

  1. air sealing detailsThe air barrier needs to be totally continuous. If you take a cross-section plan of the building, you should be able to draw the air barrier all the way around without lifting your pen.
  2. The air barriers, such as drywall, should be in direct contact with the insulation. This often breaks down in locations like walls under staircases, behind fireplaces, and under tubs where there is (hopefully) insulation but no drywall air barrier.

Where Does Most Infiltration Occur?

There are three critical types of air leaks to watch out for:

  1. Big holes.  Some common design elements can result in big holes in the air barrier. For instance, a dropped soffit is a great pathway for air leakage. Tubs and fireplaces on exterior walls can create similar holes if a solid piece of rigid insulation isn’t installed behind them. Floor joists that extend from conditioned space to a garage or balcony are another way to blow open the air barrier. While these locations can be air-sealed and insulated, good design would eliminate the potential for big holes altogether.
  2. Cracks.  Every building has a number of cracks that seem minor when taken on their own, but add up to a big air leak. These cracks occur between the sill plate and foundation, at exterior wall bottom plates, between adjacent studs, and around window and door frames.
  3. infiltration at can lightPenetrations.  Every hole cut in the exterior envelope (ceiling drywall, exterior sheathing, top plates below attic) creates a potential air leak. Penetrations include plumbing pipes, duct registers, can lights, exhaust fans and exhaust ducts, and electrical wiring.

Air is relentless: it will find any and every pathway into a building. Sealing 50% of the apparent leaks will not cut 50% of the infiltration because air will find another way in. Good air sealing aims to seal 90% of the leaks. It requires patience, attention to detail and the expertise to recognize tricky air bypasses. It also requires a clear understanding of the thermal envelope, especially at complicated architectural details.

Tips for Successful Air Sealing:

  • Good air sealing requires a plan, and should be a priority during the design phase. Ask yourself where is the air barrier? Can you draw it without lifting your pen? Check out our tips for multifamily compartmentalization.
  • During construction, air sealing should be the responsibility of all the trades. Air is persistent, and the whole project team needs to be just as thorough in fighting it.
  • A good rule for a job site is if you cut a hole, you seal it. It is easier for each trade to seal their own holes, rather than relying on one person to find everyone else’s holes.
  • Fire-stopping is not necessarily air sealing. Fire-stopping material like rock wool does virtually nothing to stop air infiltration. Use caulk or foam to air seal.

In our follow-up post we cover how air leakage is measured with a blower door test and what a good target is.

The owner of this website has made a commitment to accessibility and inclusion, please report any problems that you encounter using the contact form on this website. This site uses the WP ADA Compliance Check plugin to enhance accessibility.